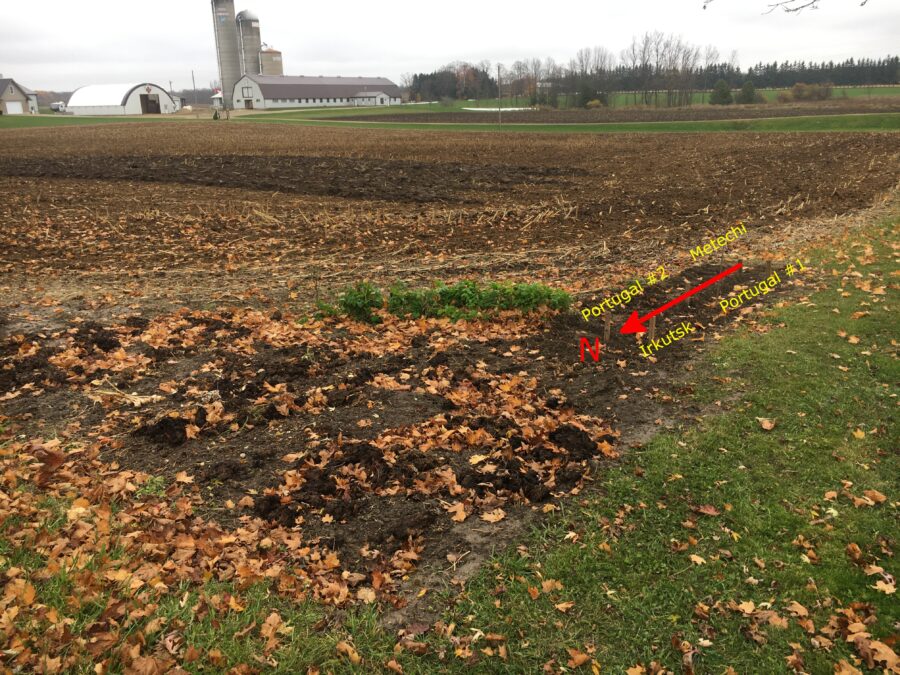
Yesterday I planted the rest of the garlic I had set originally set aside—I may add to it in a day or two, we’ll see.
This time, I used a portion of the corner of the neighbour’s field kindly on loan to me where I had not previously planted garlic, i.e., the southwestern tip, as follows:
column closest to the road
12 cloves of Irkutsk at the north end
14 cloves of Portugal #1 at the south end
column one in from that
13 cloves of Portugal #2 at the north end
13 cloves of Metechi1)I’ve never grown this type before; apparently it is similar to Persian Star only larger. Jennie likes Persian Star but the cloves always come out so small that they are far too much work, so I’ve given up on those. at the south end.
I’ve never grown this type before; apparently it is similar to Persian Star only larger. Jennie likes Persian Star but the cloves always come out so small that they are far too much work, so I’ve given up on those.
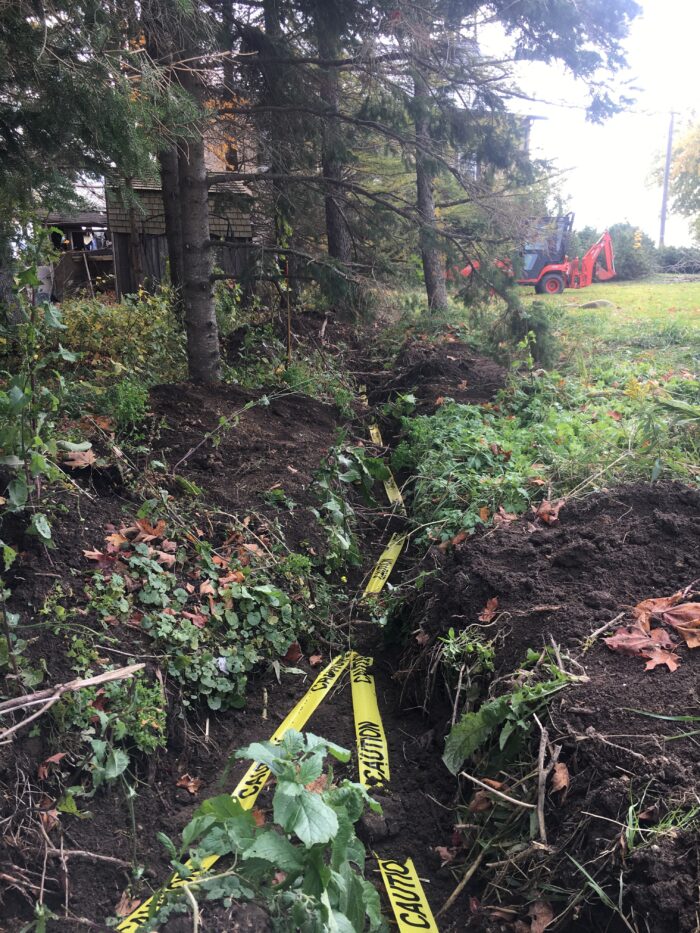
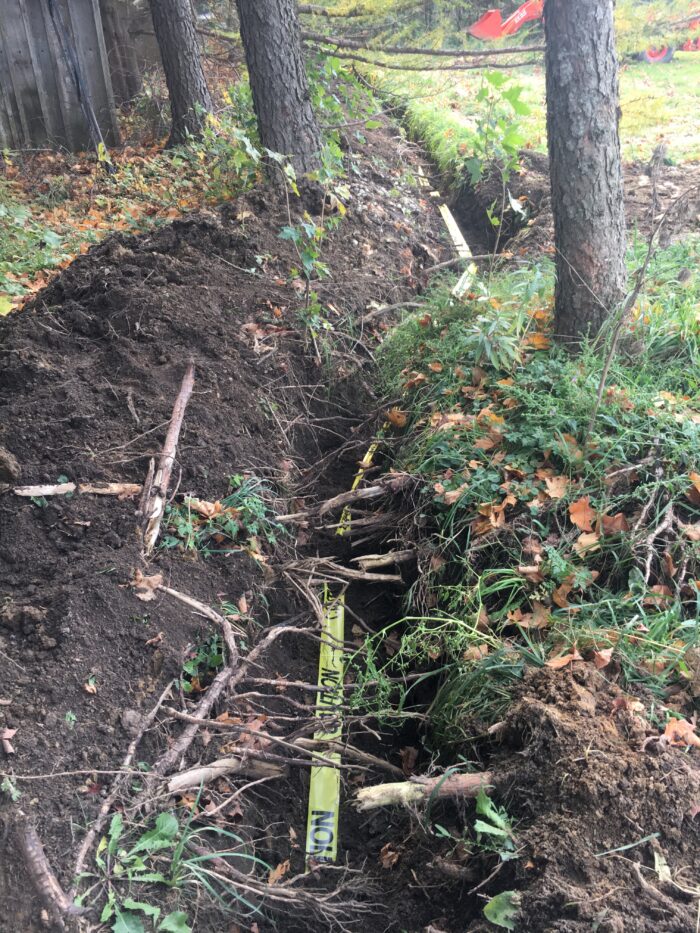
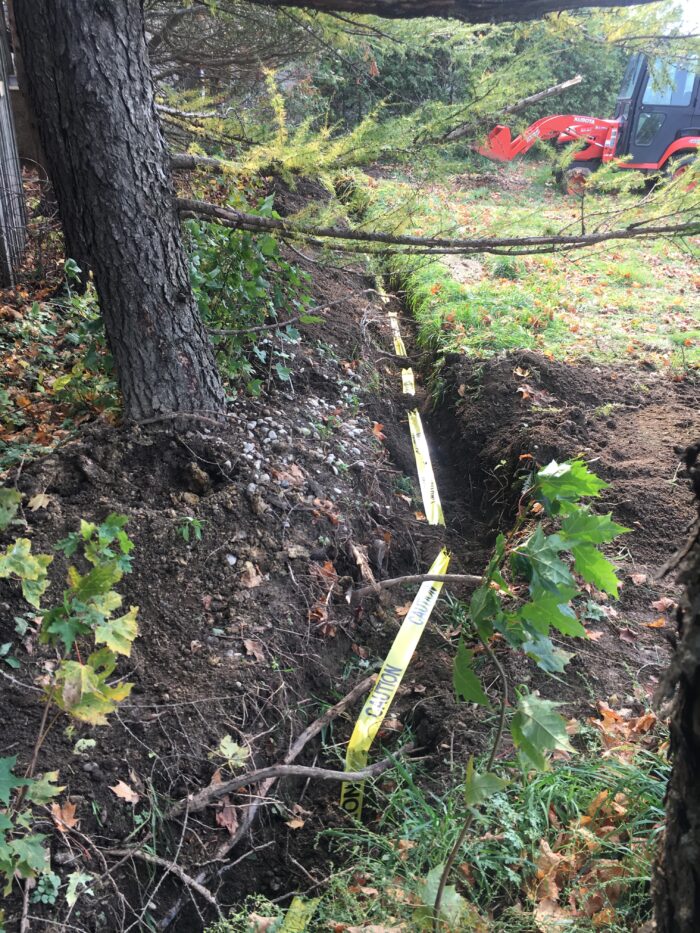
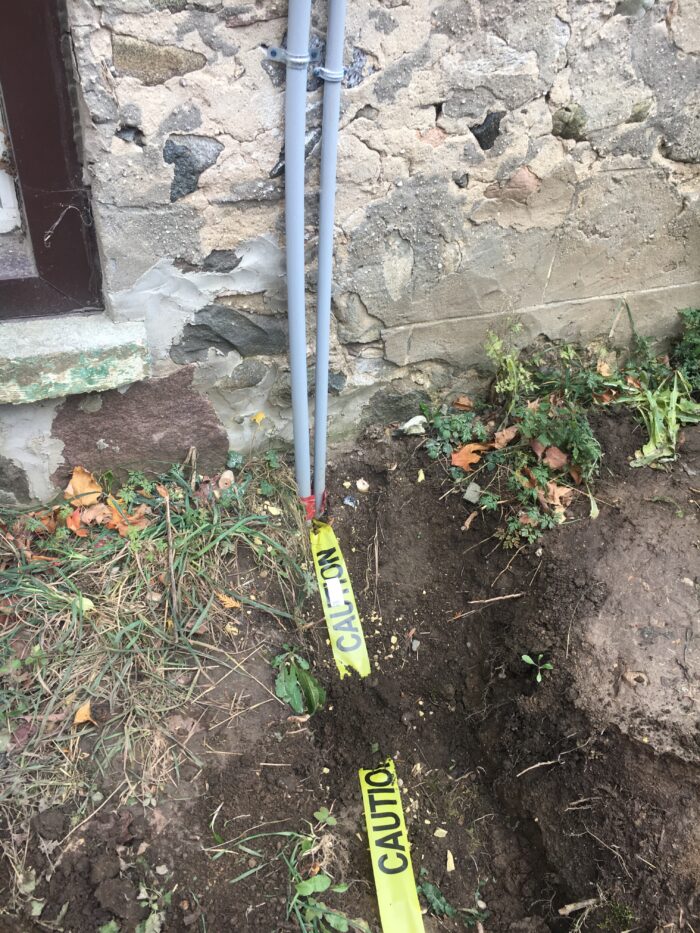
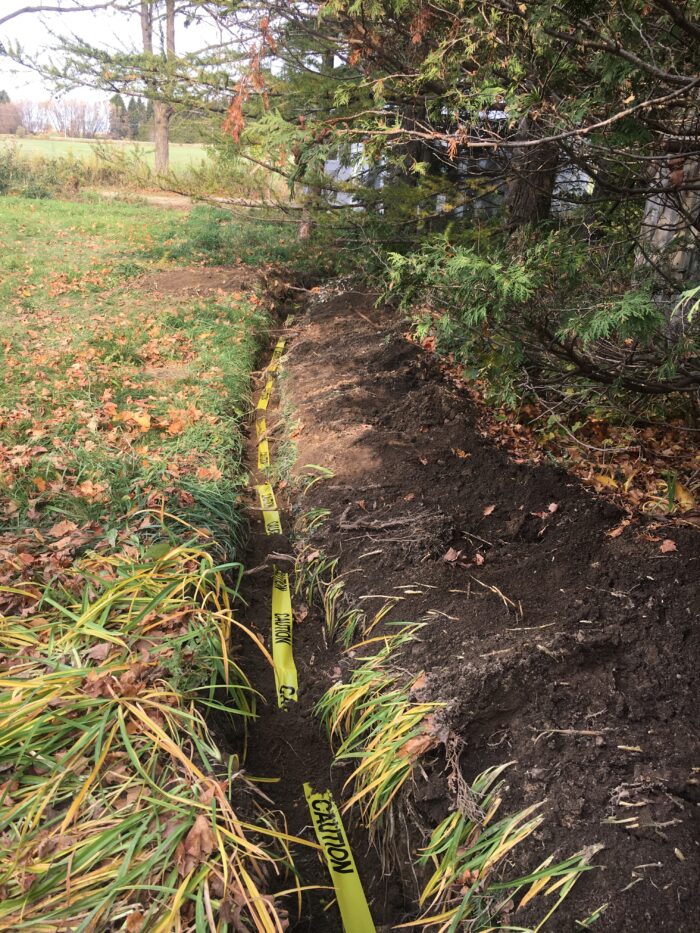
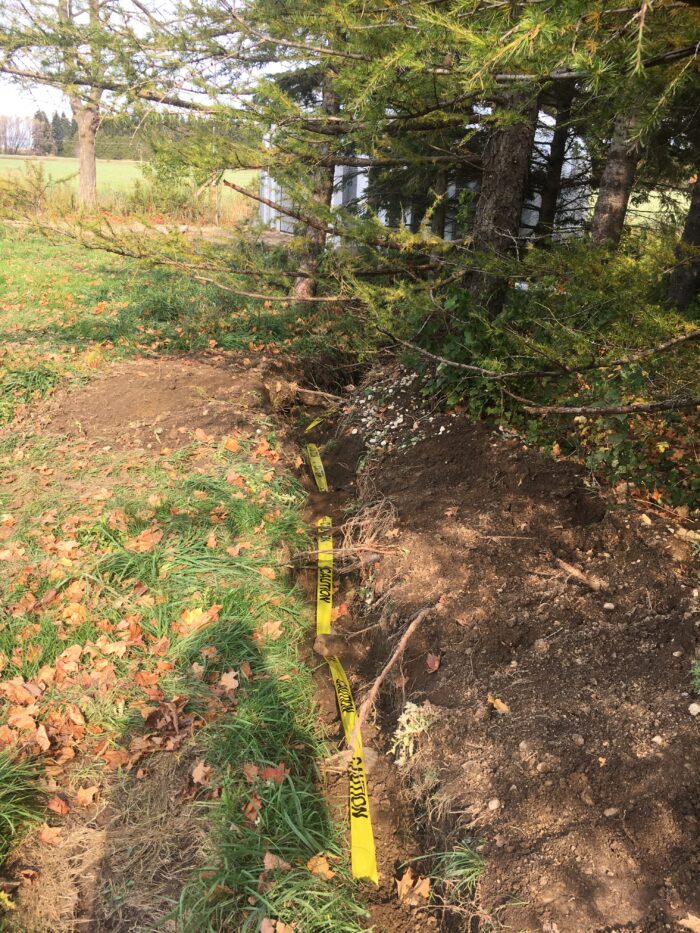
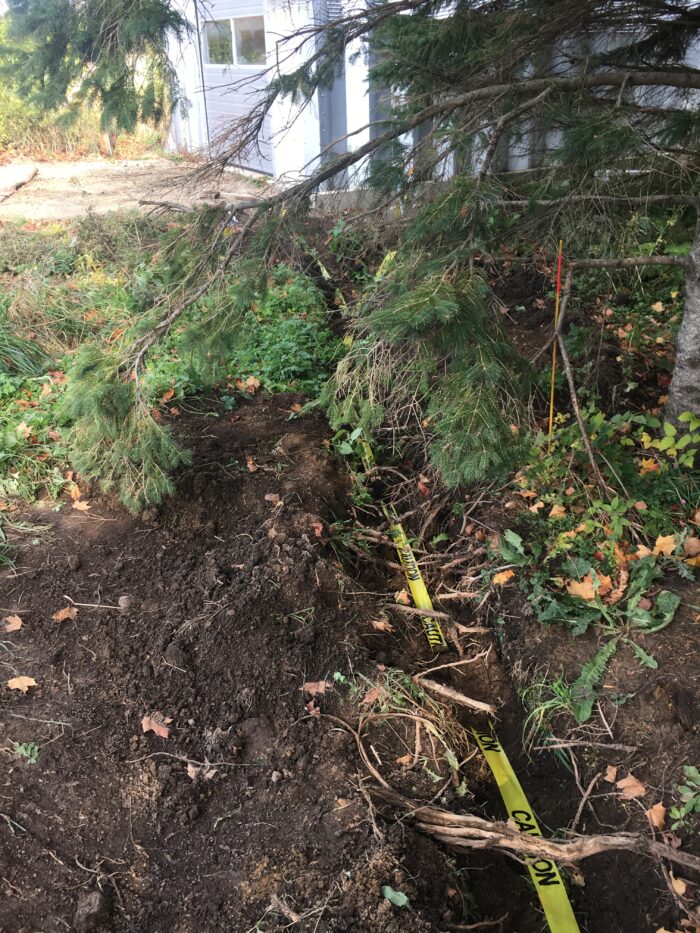
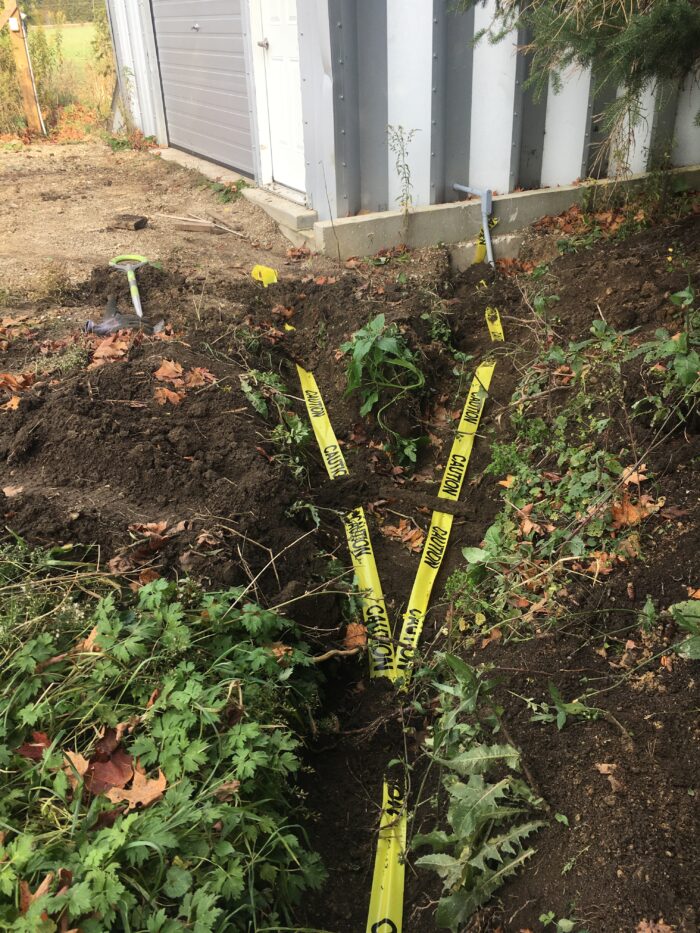
In order to get hydro to my shed and to protect the ethernet cable, I laid PVC conduit from the north side of the house to the south side of my steel shed for the electrics and past the front of the shed to the antenna tower on the north side of our property for the ethernet cable.
The electrician came last Tuesday and fed the wires through the conduit, so it was now safe for me to fill in the trench. I began doing this yesterday, and completed it today.
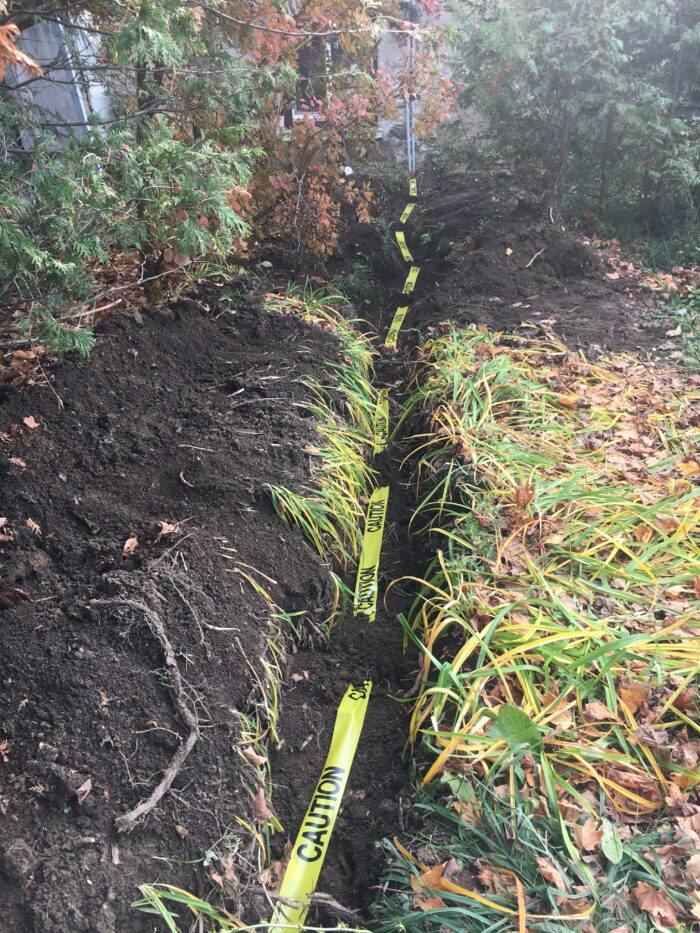
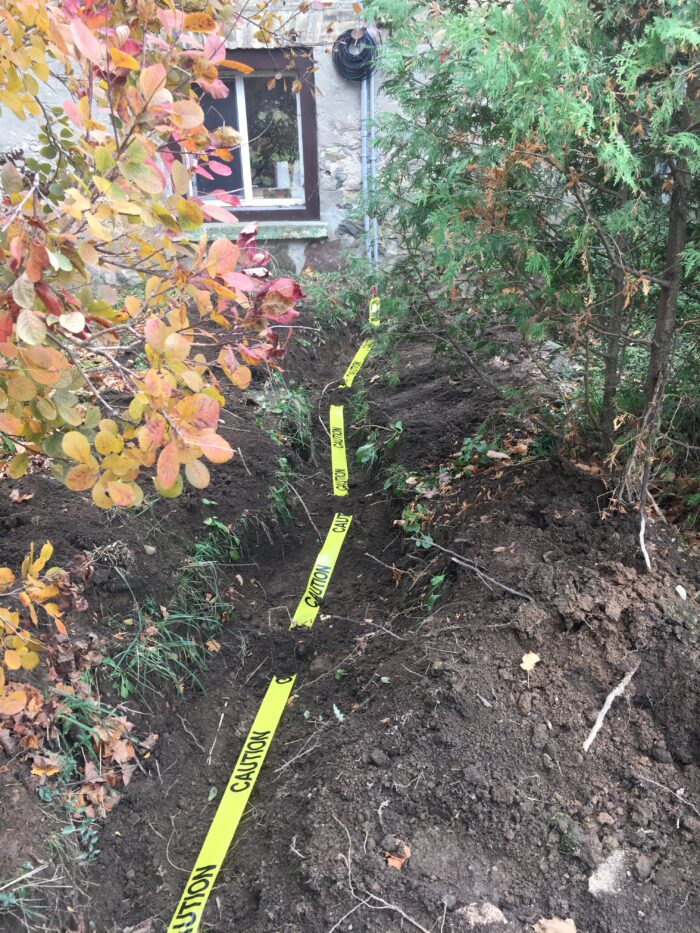
I filled the trench part way and then laid yellow CAUTION tape in it, except for the front of the shed, which I had had to fill in since I needed to be able to drive in and out;1)I guess I wasn’t thinking; there is no reason I couldn’t have put yellow tape in there when I did that! but it’s not that big a deal since it’s pretty deep and in any case is in a straight line from where the tape ends to the antenna tower.
Then I took photographs to document the approximate location, as shown below.
Photos from shed (north) to house (south)
Trench with tape facing south 1Trench with tape facing south 2Trench with tape facing south 3Trench with tape facing south 4Trench with tape facing south 5
Trench with tape facing south 6
Trench with tape facing south 7
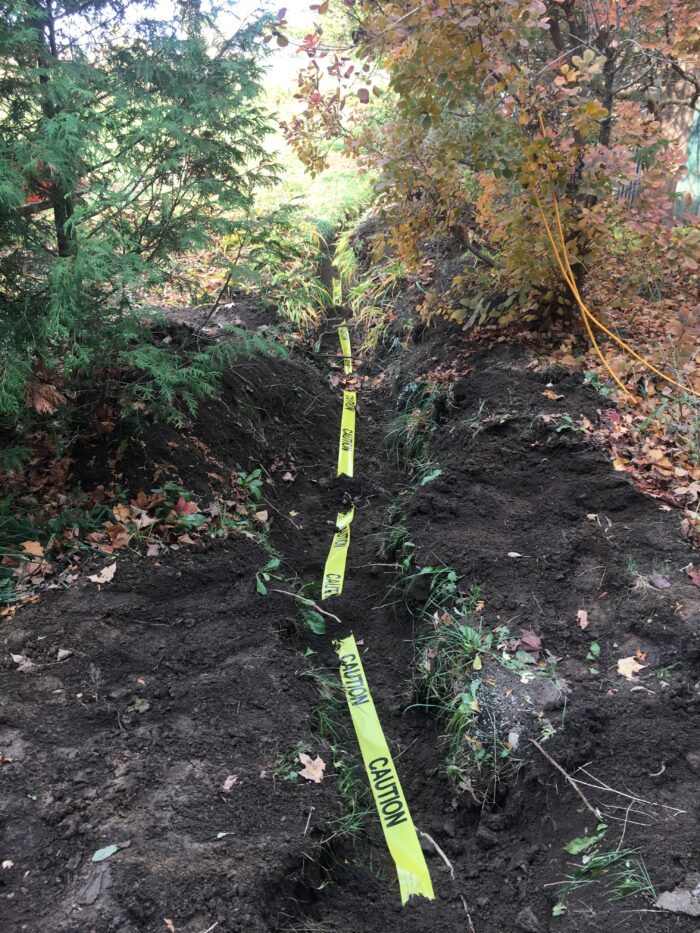
Photos from house (south) to shed (north)
Trench with tape facing north 1
Trench with tape facing north 2
Trench with tape facing north 3Trench with tape facing north 4Trench with tape facing north 5
Filling in the rest of the trench
After this, I filled in the rest of the trench using the front loader as much as I could, from both sides where this was possible.
I drove around the side of the house and tried to get past the trench as it wound its way through the cedar trees; not impossible but touchy.
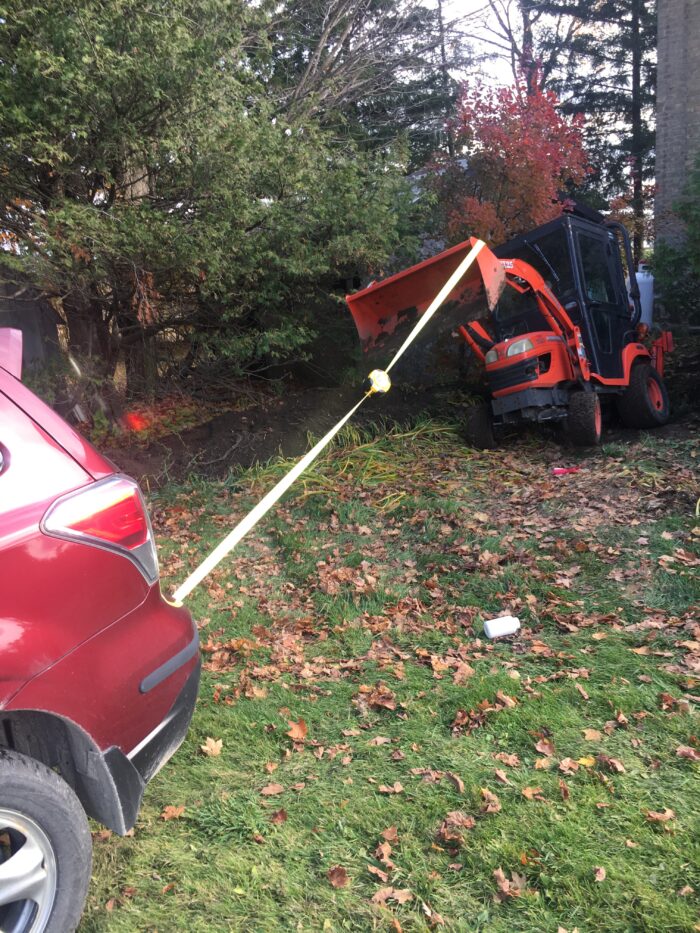
Guess what? I didn’t make it. The tractor got stuck in the trench and started to lean very badly to the right. Furthermore, the fuel sloshed over in the tank so that it wouldn’t feed properly and died. Total bummer.
I panicked for a bit, and wondered whether I should call the neighbour (a farmer) to come and help pull me out. But then, I had a (perhaps foolhardy) idea….
Pulling the tractor out of the trench
I got our Subaru Forester, mounted the hitch on it, took the emergency tow from my car, and hooked it up to the tractor. I pulled up up just enough that it was reasonably level, at which point I was able to start it, and drive forwards. Saved!!
After that, I finished filling the trench with the backhoe. It’s more of a nuisance, since it involves anchoring the tractor with loader and struts, moving some dirt, raising struts and loader, moving tractor, …, and repeating every 10 feet or so. But it worked!
I discovered last night that the olives in the refrigerator were developing white mould on the surface of the brine. This was no big surprise, in fact, I’m surprised it didn’t happen sooner, since the refrigerator in question hasn’t worked properly since the beginning of the pandemic shutdowns in March. The replacement hasn’t arrived yet (it’s due on November 19th) and I simply didn’t get around to doing anything with the olives.
Preparing the olives
So, I rinsed them multiple times in the sink and left them to soak overnight and packaged them into freezer bags this morning. I tried a few; they didn’t taste of mould at all, but they also didn’t taste of brine anymore (big surprise!) so I thought I should maybe cook with them.
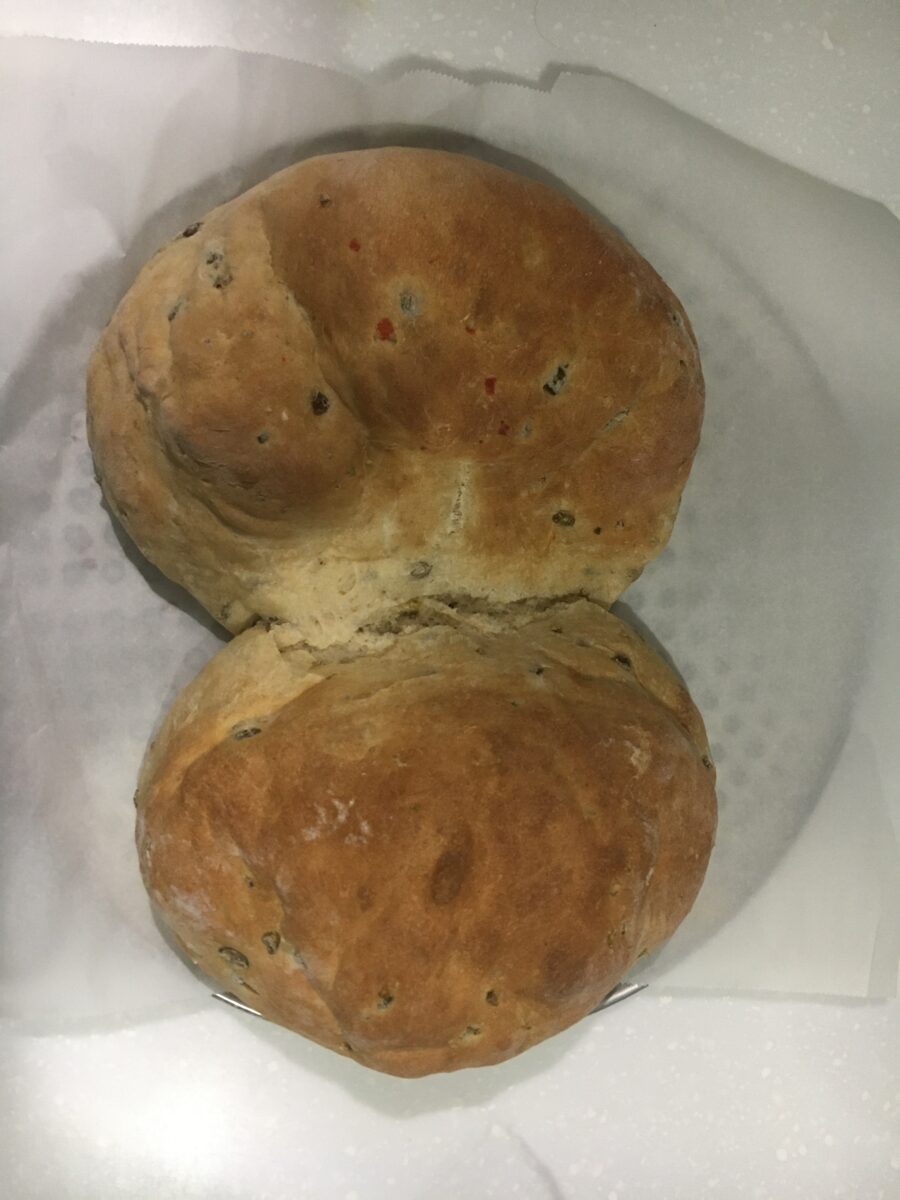
Olive bread—attempt one
I did a quick internet search for an olive bread recipe, and found this one, suited to the bread machine.
The first time, I forgot to put the chopped olives into the nut and raisin container in the lid and dumped them in with the regular dough ingredients instead. It’s a feature I’ve only used once or twice, and that was long, long ago!
Not surprisingly, the dough was far too wet; I ended up adding one extra cup of flour part way through the cycle. It was still a little wet, but rose nicely. My wife suggested it might not cook entirely on the inside, so I ended up cutting it in half to make two smaller loaves and rising it a little longer in a slightly warmed oven. It seems to have turned out just fine; I gave one each to two of our neighbours.
Olive bread—attempt two
The second time, I was more careful, and put the chopped olives into the lid compartment as suggested. This time, the olives were not mashed up as much; the dough was still too wet, to my mind, but one third of a cup of flour seemed to do the trick.
The loaves didn’t rise quite as well as the first time around, for whatever reason, but the results were ok.
Overall assessment
The recipe I chose works well enough as a starting point—reviews on its page rave about it, in fact—but I think it needs some customization:
Assuming one would like to keep to the specified flour quantity (3 cups),1)This is the maximum recommended for my machine, so I’m going to go with this. the water should definitely be reduced. An equivalent challah loaf nominally calls for 1 cup 1 oz of liquid, including egg (so about the same specified here) but I’ve found that reducing this to 7 7/8 oz is preferable. Add to this the fact that olives contain some moisture, and I’m inclined to try 7 1/2 oz next time around and go from there.
3/4 cup of olives came out to exactly 100g the first time I measured them out. I found the result a bit sparse in that department, so I think I’ll go for 150g next time.
Today I did a number of things with a view to beginning to fill in the trench from the house to my steel shed now that the electrician has been and run the wires.1)He will come back once I’ve moved all the things in my shed to the centre to instal the panel, lights, and some receptacles.
The tractor fuel was getting low, so I drove to the Chalmers fuel station nearby and got myself 20 litres of diesel.2)I had already put conditioner into the jerry can some time back in anticipation of this.
Then I had to set up the tractor for the job. This involved
dropping the rear-mount tiller in the back of our yard near the tree line3)There is no need for it to live in the shed, where it would just take up a lot of space.
removing the three point hitch
mounting the backhoe,4)This was quite painless for a change. I keep it on a dolly I made for the purpose, and was able to wheel it into place, use the struts to raise it just a fraction, slide it in, line up the pin holes, and mount the pins. It took maybe 20 minutes, possibly less. and
removing the mower deck.5)I ought to have done this before removing the backhoe to mount the tiller in the first place, but forgot!
Then I started filling the trench. It sounds easy enough, but the reach with the front-end loader is limited, and the dirt pile from the trench was on the far side in most cases.6)Going to the other side of the trench was mostly awkward because of various obstacles on that side. I didn’t want the front wheels of the tractor to get too near the trench lest there be a cave-in and I end up stuck. I could have turned about and used the backhoe, but that involves a lot of mounting a dismounting every few minutes to move the tractor to the next segment of the trench.
I used a shovel to even it out a little, and got probably 75% of it done before I felt that I should likely give it a rest and continue another day. No point in getting hurt.
This was quite painless for a change. I keep it on a dolly I made for the purpose, and was able to wheel it into place, use the struts to raise it just a fraction, slide it in, line up the pin holes, and mount the pins. It took maybe 20 minutes, possibly less.
It was a nice day to day, and I was able to take a bit of time out from my teaching and marking schedule, so I made a start on the garlic planting. I had originally planned to do it during Reading Week (the week of Thanksgiving), but I had so much marking to catch up on that it just didn’t happen.
My harvest this year was pitiful, so I bought new starter bulbs from Golden Acres garlic farm. I spent a half or so going through the bags and breaking up some bulbs into cloves to come up with a preliminary plan. I have some bulbs left of each variety if I decide to plant more.
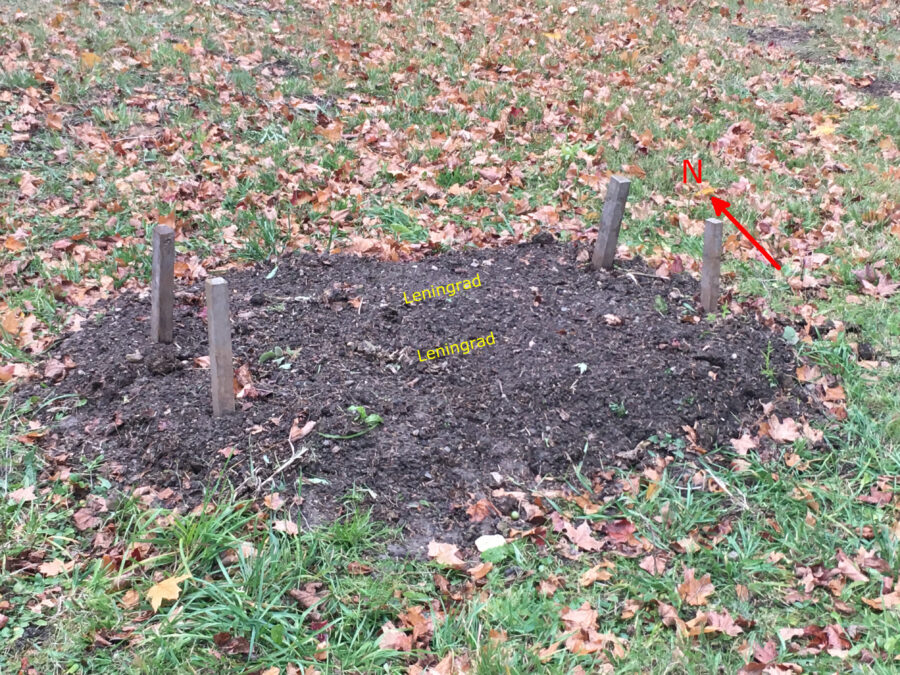
So today, I decided to start with the Leningrad variety and set aside 30 cloves. I planted it in two places (just like with stocks, it’s a good idea to diversify!):
behind the house, in a patch which I started this year for tomatoes and lettuce, I planted two rows from east to west of 9 cloves each spaced 6″ apart and with 16″ between the rows to allow for the mini-tiller to pass through, and
in the triangular area south of our driveway kindly on loan to me by our neighbours, I planted the remaining 12 cloves south of and parallel to the parsnips which I planted there earlier this year (which I am leaving to overwinter as it improves the flavour tremendously). The spacing between cloves was also 6″, and this was new ‘garlic territory’.
Depending on weather and time, I’ll continue with the remaining varieties, which should fit in the southern tip of the triangle, again in a spot I’ve never planted garlic before.
In the past, when I had more space at my disposal, I practiced crop rotation fairly diligently, but I haven’t the last few years, and it shows: the cloves have been infested. I don’t use any kinds of repellents, so this is to be expected to some extent; but I’m hoping to have some decent return next summer.