
I started working on Rocksmith 2014 custom downloadable content file (CDLC) last year. There is an otherwise excellent version on CustomsForge already, but the author isn’t a bassist and the bass line leaves a lot to be desired. I did try to contact him but without success.
I created a CDLC with just the bass line, and it works quite well; however, it doesn’t quite follow all the standard CustomsForge protocols, so I may perhaps as well start over. In order to keep everything straight, I will chronicle the steps taken here.
Preparing the sound file
Obviously, a sound sound file is essential to a quality product (pun intended). I began with Lucy in the Sky with Diamonds.wav, a sound file taken from the CD, which I placed into a dedicated folder.1)I’m currently using the following structure: Desktop > Rocksmith > CDLC > <name of song and/or artist>. But it’s up to you!
I imported this file into Editor on Fire (EOF) and inspected it:
- Launch EOF2)Note: I used to do this on my Mac, running Windows through the Parallels VM, but lately this has become precarious, so I am now doing it on an actual PC for best results.
- File > New and select .wav file, then
- Song > Waveform Graph > Show (or F5).
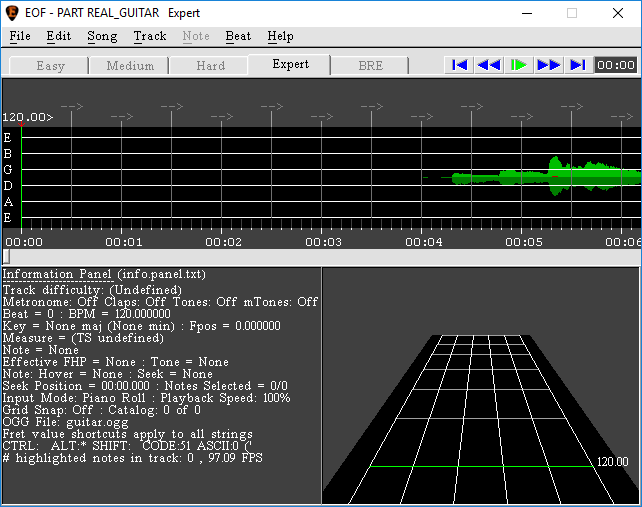
As seen in the wave graph, there was an irregular leading silence (in fact with some noise in it). It’s helpful to set this up more precisely, so I loaded the file into Audacity and trimmed the leading and trailing silence, then added the following metadata upon saving:3)According to Firekorn’s tutorial, EOF will load this information if it is available, but that didn’t happen for me….
- Artist: The Beatles
- Track Title: Lucy in the Sky with Diamonds
- Album Title: Sergeant Pepper’s Lonely Hearts Club Band
- Track Number: 3
- Year: 1967
- Genre: Rock
I saved the file into the original folder as Lucy in the Sky with Diamonds trimmed.wav.
Importing into EOF
The next step was to import the newly trimmed file into EOF:
- File > New and select the trimmed .wav file
- Add the artist and title for EOF to use in the new dialogue:
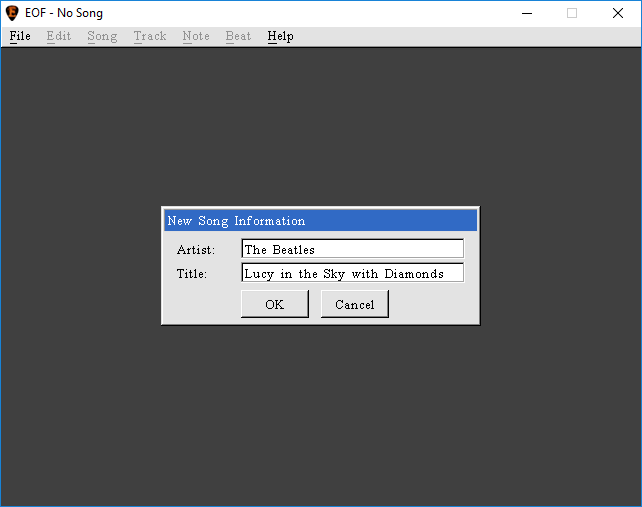
Once I hit ok, I was prompted regarding where to store EOF’s output files. I like a tidy set-up, so I opted to place all the new stuff in the same folder where the two .wav files already resided.
EOF then converts the input file to .ogg (if it wasn’t already in that format) after asking about encoding quality. I set it to high quality (it seems to default to 96 kbps), but that may just be a waste of space….
Adding leading silence
An important consideration to keep in mind when adding leading silence is that there must be at least one empty measure on the tempo map4)The grid marking measures and intervals in EOF. before the first guitar or bass note, plus 10 seconds. In the case of anacrusis5)I.e., when the first measure is only partial compared to the time signature), add sufficient leading silence so that the first full measure begins in the right spot.
In this instance, there was no anacrusis, so the math was simply
leading silence = 10 seconds + 1 full measure
where full measure was calculated in terms of beats per minute. Given a nominal 124 bpm and 3 beats per measure, that amounts to
10 + 3 / 124 × 60 seconds
and since EOF adds leading silence in milliseconds, that comes to
( 10 + 3 / 124 × 60 ) × 1000 milliseconds
i.e. 11,452 milliseconds rounded. This is done with
- Song > Leading Silence:
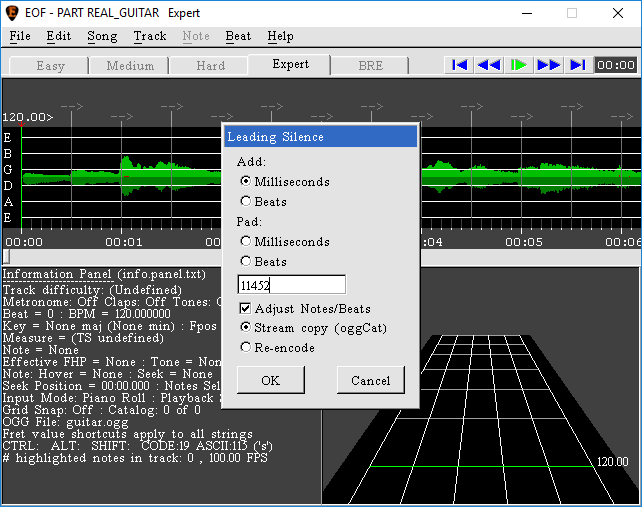
Note: Sometimes, using the default option Stream Copy (as shown above) fails (as in fact it did with me). In that case, just start that step over using Re-encode and all should be well.
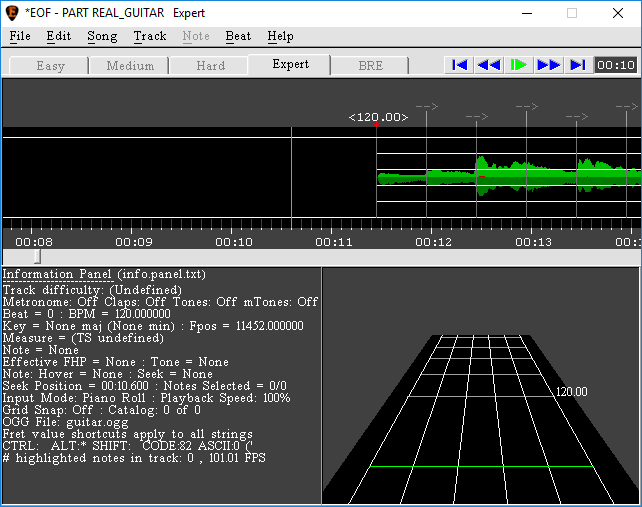
The leading silence will now become visible in the graphical view; the arrow keys can be used to move back and forth to see the beginning of the song. (Remember to use Song > Waveform Graph > Show or F5 if the waveform does not show up.)
Setting up the tempo map
The next step is critical, and can be tedious; but it’s important to get it right because it makes all the difference to a quality or non-quality product in the end. In a mechanically-generated scenario (for example, MIDI music produced by Guitar Pro or the like), it’s a fairly simple process, since the output will be completely regular. But human beings, especially in a band scenario, are not mechanical devices. and we can expect some variance in tempo beyond the official changes called for by the tune.
Firekorn’s tutorial (see the links in section 1b, just before the video) mentions various tools which can help. I personally like to do it myself the hard way, as it makes me more aware of the details of the song.
In principle, what one wants to do is to set up an approximate tempo map overall, and fine tune where the variance is sufficiently significant.6)The definition of ‘significant’ in this context will depend to some extent upon one’s ability to detect variance in conjunction with what is perceived to be of practical consequence when the CDLC is used. This comes by experience and one can always come back and adjust further if required.
Sectioning the song
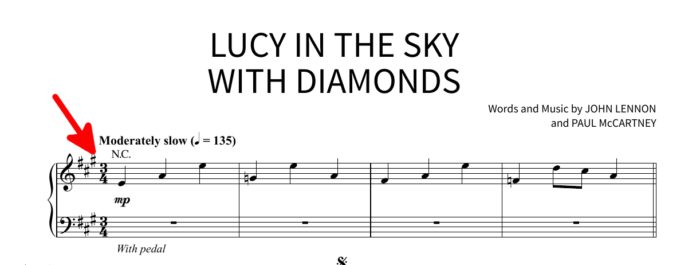
The song begins in three/four time:
This particular tune changes beat a few times, which means that the song had to be partitioned into sections, each of which was then to be fine-tuned individually.7)When such is not the case, one can approach this process globally.
Incidentally, we only care about the beat count here; the scale, as indicated by the number of sharps and flats, is of no consequence for the purpose of generating CDLC. Whether or not this is the case will be evident from reading a score of the tune, whether as published in a book or found elsewhere.8)Of course, this is also evident from listening to the beat when playing the song, but that may be tough for some.
The beats per measure change in the following places, in sequence:
- to two/two on ‘gone’, in ‘… with the sun in her eyes and she’s gone’
- to three/four on ‘Follow’, in ‘Follow her down to a bridge …’
- to two/two on ‘gone’, in ‘… with your head in the clouds and you’re gone’
- to three/four on ‘Picture’, in ‘Picture yourself on a train …’
- to two/two on the third measure of ‘eyes’, in ‘… girl with kaleidoscope eyes‘9)This one is a bit tricky. ‘Eyes’ has two measures of three beats followed by one measure of two beats. Unlike the previous cases, there isn’t a change in wording to signal the change in beat!, followed immediately in the next measure by a final change to
- four/four on ‘Lucy’.
So, in principle, there are six separate sections to deal with, where adjusting the tempo map is concerned. For each one,
- I ensured that the first beat marker (vertical line) in the tempo map coincided with the corresponding beat
- set the timing at that point
- counted the measures to the next signature change10)This can be done either by counting manually in the score, or by counting while listening until the next beat change. Either works fine, providing that the score is faithful to the actual music in that regard., and
- dragged the n-th measure marker to its correct spot in the graphical display.
In this way, each section began and ended in the correct spot, and there were also the correct number of measures (and thus beats) to match the music in between—though they were not all necessarily in the correct places, given the variances alluded to above.
Stage one (in which Doris gets her oats)
Here’s how this first adjustment worked out in practice, section by section.
Section one
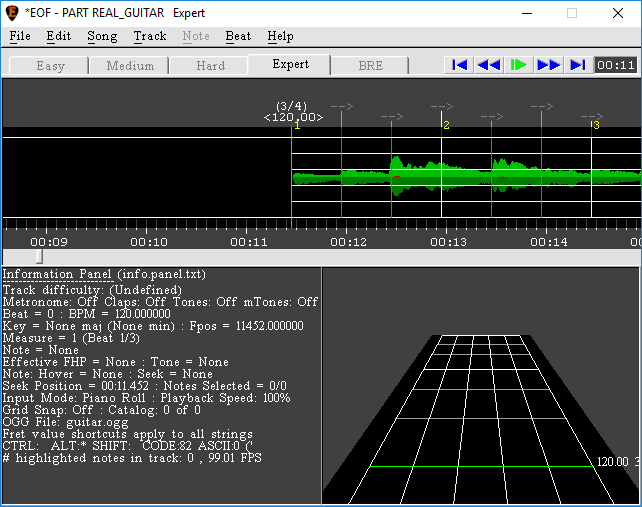
First, I set the time signature to three/four on the first beat of the first measure. Here’s how that’s done:
- select the first beat by clicking the bpm (defaulted to 120.00 for the moment) to set the pointer
- Beat > Time Signature > 3/4.
The tempo map reflects the change by placing the new time signature above the first beat and also numbering the measures.
Now, remember that one empty measure is needed before the first beat.11)As I learned from experience, the end-product will not work unless this is done! So the actual first beat has to become the first beat of the second measure. This is done very simply by
- clicking and dragging the anchor (the red downwards arrow under the bpm) of the measure numbered 1 to the 10 second mark, then
- dragging the measure numbered 2 to the actual first beat, i.e., the beginning of the wave graph, which anchors it as well.
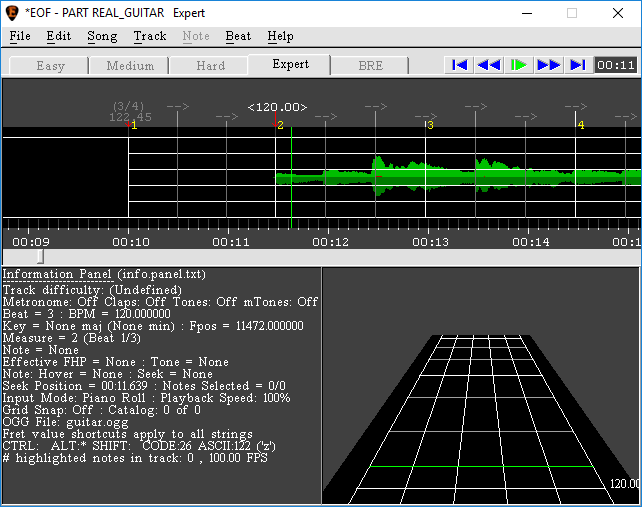
Note that the first bpm count has been adjusted from the nominal default of 120 to an actual 122.45, reflecting the fact that the first three beats are spread over a shorter time span, resulting in an increase. This is of no consequence whatsoever, and is pointed out here only because the same thing happens any time we move a measure marker to other than a pre-calculated position.
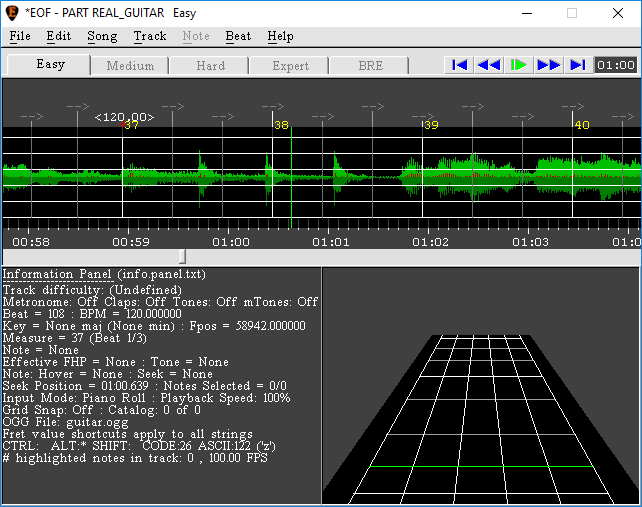
Now, there are 35 measures in this section, which means that I had to move the measure numbered 37 (we start at 2! add 35) to the beat marked by the first ‘gone’ in the lyrics, as discussed earlier. For me, that was just before the 59 second mark, which, before adjusting, was near the end of the measure marked 33. Incidentally—while one should aim for as much accuracy as possible, there’s no need to lose too much sleep here: anchor points can always be adjusted at a later date should this prove necessary.
Notes
| ↑1 | I’m currently using the following structure: Desktop > Rocksmith > CDLC > <name of song and/or artist>. But it’s up to you! |
|---|---|
| ↑2 | Note: I used to do this on my Mac, running Windows through the Parallels VM, but lately this has become precarious, so I am now doing it on an actual PC for best results. |
| ↑3 | According to Firekorn’s tutorial, EOF will load this information if it is available, but that didn’t happen for me…. |
| ↑4 | The grid marking measures and intervals in EOF. |
| ↑5 | I.e., when the first measure is only partial compared to the time signature), add sufficient leading silence so that the first full measure begins in the right spot. |
| ↑6 | The definition of ‘significant’ in this context will depend to some extent upon one’s ability to detect variance in conjunction with what is perceived to be of practical consequence when the CDLC is used. This comes by experience and one can always come back and adjust further if required. |
| ↑7 | When such is not the case, one can approach this process globally. Incidentally, we only care about the beat count here; the scale, as indicated by the number of sharps and flats, is of no consequence for the purpose of generating CDLC. |
| ↑8 | Of course, this is also evident from listening to the beat when playing the song, but that may be tough for some. |
| ↑9 | This one is a bit tricky. ‘Eyes’ has two measures of three beats followed by one measure of two beats. Unlike the previous cases, there isn’t a change in wording to signal the change in beat! |
| ↑10 | This can be done either by counting manually in the score, or by counting while listening until the next beat change. Either works fine, providing that the score is faithful to the actual music in that regard. |
| ↑11 | As I learned from experience, the end-product will not work unless this is done! |