Your go-to source for all things weird and wonderful

Author: Karljürgen Feuerherm Page 4 of 8

Front view of BX25 with cab and snowblower

Mounted snowblower

Removed the front loader from my tractor today and mounted the snowblower instead.

Removing the loader wasn’t too hard:

  1. I positioned the backhoe dolly such that the wide end lay under the loader stand when it is in the support position
  2. Lowered the bucket until the stand was touching the crossbar of the dolly
  3. Tilted the bucket down (move lever left) to raise the front wheels slightly off the ground, which removes the pressure from the pins
  4. Pulled the pins and stored them in their holders
  5. Tilted the bucket back (move lever right) which lifts the boom anchors out of their sockets
  6. Turned the engine off, wobble the level to dispel the hydraulic pressure, disconnect the hoses, rollled the loader away.
    The front-loader sitting on its dolly in the corner of the steel shed, with the snowblower dolly in front of it
    The loader sitting on its dolly and the snowblower dolly

To mount the snowblower,

  1. I mounted the quick hitch onto the front of the tractor and connected the hoses1)Hose #1 goes towards the cab, #4 at the opposite end.
  2. Wheeled the snowblower on its dolly into place
  3. Raised the hitch so as to line it up with the socket of the snowblower on the dolly, and connected the two,2)This involves a bit of fidgeting as the clearance is not great and the dolly angle causes a bit of pressure. then connected the hydraulics3)Hose #2 goes next to hose #1 and hose #3 goes into the remaining position.
    The snowblower quick hitch
  4. Connected the drive shaft from the snowblower to the hitch4)This is a real nuisance; there’s very little clearance to get hands in there, and getting the collet to snap once the shaft has been pushed in is a pain. I wasn’t able to do it with my rubberized gloves on.
    Close-up of the drive shaft connection between quick hitch and snowblower
    Close-up of the tiny awkward space for the hands to connect the shafts
  5. Connected the drive shaft from the hitch to the mid-PTO.5)Another nuisance; again, snapping the collet into a lock is hard even though there is some room to manoeuvre and everything is well-greased.
    Drive shaft to mid-PTO connection

I’m getting better at it, but the whole business still takes longer than it should.

Notes

Notes
1 Hose #1 goes towards the cab, #4 at the opposite end.
2 This involves a bit of fidgeting as the clearance is not great and the dolly angle causes a bit of pressure.
3 Hose #2 goes next to hose #1 and hose #3 goes into the remaining position.
4 This is a real nuisance; there’s very little clearance to get hands in there, and getting the collet to snap once the shaft has been pushed in is a pain. I wasn’t able to do it with my rubberized gloves on.
5 Another nuisance; again, snapping the collet into a lock is hard even though there is some room to manoeuvre and everything is well-greased.

Garlic fall 2020 (3)

I had decided that given an opportunity, I might add to the garlic patch at the back of the house,1)I want to keep the triangle south of our driveway for other things such as sweet potatoes and tomatoes. but with one thing or another (mainly work!) I didn’t get around to it until yesterday!!

Prepraring the area occurred in three steps:

  1. I put some cardboard on the proposed extension area, i.e., an area roughly equal in size to what was already there and adjacent and to the south of it. Some friends of ours had suggested this as a way to keep down the invasion of grass and weeds. It can’t hurt, so why not.
  2. Our next door neighbour Matt had kindly dropped off some manure into the pile which he has for me in the corner of his property adjoining the northeast corner of our lot some time back, so I fetched a tractor-bucket load of it and dumped on the cardboard, then evened it out with a rake.
  3. Finally, I then got a bucket-load of topsoil from the pile I had left from excavating the foundation for my steel shed, and put that on top and smoothed it out as well.

With the area prepared, I planted two more east/west rows, again at 18″ intervals. Here’s what I planted:

  • In the first row (heading south),
    • 5 cloves of Metechi at the west end, and
    • 4 cloves of Irkutsk at the east end;
  • In the second row (i.e., the southernmost one),
    • 2 cloves of Irkutsk at the west end, and
    • 6 cloves of Portugal #1.

I planted all of those varieties in the triangle plot, but I’m learning to treat garlic as I would a stock portfolio (if I were richer than I am)—diversify!2)This helps to protect the ‘investment’ in the event that there is a local pest infestation or the climatic conditions are better in one spot than the other (our lot is heavily treed so that’s a distinct possibility here).

Notes

Notes
1 I want to keep the triangle south of our driveway for other things such as sweet potatoes and tomatoes.
2 This helps to protect the ‘investment’ in the event that there is a local pest infestation or the climatic conditions are better in one spot than the other (our lot is heavily treed so that’s a distinct possibility here).

iPhone Outlook password

Yesterday I had my university password reset. It had been a while, and my Mac informed me that there had been a data leak. Better be safe than sorry, right?

Well, the reset protocol didn’t work, and it was a major ordeal to get help with that on a Sunday, but it got done in the end. I now ‘enjoy’ a macOS-generated high security password.

I discovered this morning that for whatever reason, it hadn’t propagated to my iPhone, despite the iCloud synchronization being turned on. No idea why. So when Outlook asked me to do an Office365 sign-in, I dutifully obliged.

But … the old password did not work. The new password did not work. The iCloud password did not work. My computer’s administrator password did not work ….

Then I had an idea. When attempting to enter the password on the iPhone, of course the input turned to bullets; expected, but there was no ‘show’ option to see that I’d got it right, though it looked right as I typed it. So finally, I typed it into the body of an email, verified it against the Keychain password on my Mac, and copied and pasted it in. Presto!

Apparently the iPhone was either capitalizing or performing some other idiotic ‘correction’ which I could not see!

Home file permissions

For some reason, a number of files in my Mac’s home account have become inaccessible.

Doing an info (command-I) on them says they are supposed to be readable and writeable by me, which makes sense, since I created them. But in some cases, they are not. When I try to access them, I am asked for a password, and when I give it, I still do not get access.

Under Catalina (and now, Big Sur), the solution is as follows:

  • Shut down the machine
  • Press the Power button to reboot, then immediately hold down command-R to enter Recovery mode
  • Keep it held until the Apple logo vanishes and then re-appears
  • When the recovery options appear, from the menu click
    • Utilities, then
    • Terminal
  • In the terminal window, type repairHomePermissions (note the capital letters)
  • A dialogue screen will open; follow the instructions, then
  • Click the Apple logo and shut down again.

Note that this procedure involves providing an administrator password on two occasions.

Officially, Apple wants us to reinstal the operating system after this as well. However, the support person I spoke to when I had the trouble with the external monitor recently suggested that she has not found that to be necessary. So I decided not to do it, as I’d already wasted a lot of time doing that sort of thing with the monitor problem.

So far, so good.

External monitor blank

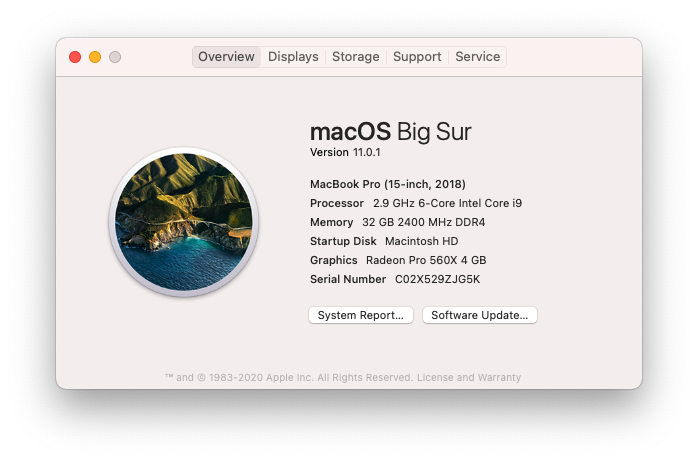
For the last few days, my Philips external monitor has not come on when I’ve booted up my MacBook Pro in the morning.

Oddly, I discovered more or less by accident1)During my last hardware debugging session, I had moved the power cable from a port on the right to a port on the left. But remembering that apparently having it on the left can result in overheating, I moved it back to the other side. that if I unplugged the HDMI to USB-C adapter and moved it to a different port, the display would spring to life. Ok … that’s at best a work-around, not a solution—as I indeed found out later.

First round of debugging

Things I tried in order to resolve the issue:

  • unplugging and replugging the monitor
  • unplugging and replugging the adapter
  • replacing the HDMI cable
  • rebooting the computer
  • rebooting the computer in Safe Mode
  • rebooting the computer to reset the SMC
  • rebooting the computer to reset the NVRAM
  • reinstalled macOS Catalina (a 55 minute operation on rural internet), and
  • a few other things I can’t recall just now, but which I’ll add here if I think of them later.

Apple Support, take one

I contacted Apple Support under my Apple Care plan, and once I’d convinced the person at the other end that I’d tried all this, I was escalated to a senior adviser who had me do the following:

  • delete two files of the form com.apple.windowsserver*.plist,2)One was in my home settings, one was global; unfortunately, even though I’d saved this information, it was lost in the steps which follow. and
  • reboot.

He was confident this would solve the problem. He was wrong.

He had told me that if that didn’t work I could escalate to Apple Engineering, and he’d put a note on the case to that effect, but warned me I’d have to use the phone for that, rather than chat (likely due to the reboots I’d be likely to have to perform?). So I called in again.

Apple Support, take two

Asked to escalate to Apple Engineering. Whether that’s what they did or not, I don’t know. In any event, the new person reviewed the whole business with me and agreed that since this started happening right after the last patch to Catalina 10.15.7,3)Again, I had the code stored, but lost that …. it was likely an operating system issue and a restore to a previous point could prove that.

Unfortunately, the last time I contacted Apple (to get my input method for cuneiform running again), the solution, which involved resetting the SMC and NVRAM, inadvertently put my back-up system off-line, which I was unaware of until 10 days later when my system kindly informed me that I hadn’t done back-ups in 10 days!4)I will try to post on that shortly if I have the time, then come and back-fill this post with the link. So this left with me only two options: backing up to October 25th (a long way back from ‘today’, which at the time was November 12th), or to November 10th;5)I think. Thanks to everything I’ve done since, and my poor memory, it’s hard to be sure. I opted for the latter as the less painful option.

Keeping in mind that I’d only just experienced a loss of back-up system, this was not the most comforting solution—and maybe a bit like dropping an atom bomb to kill a mosquito—but I didn’t like the idea of living with the problem, so in for a penny, in for a pound ….

Started the back-up. ETA to completion: 40 hours. Ok, so we know that’s likely an over-estimate based on insufficient experience, and likely to go down, but still.

As there was no point the support person sitting around for hours, she sent me an email so I could let her know when it was done and we could resume debugging, if and when. My options were to reply to the email with text or to click on a link in the email to go to an Apple messaging site where I could leave a voice message of up to 5 minutes. Good.

On my own

I monitored it regularly, with my heart in my mouth; indeed, the ETA dropped more and more rapidly, so it looked like it might finish around midnight. At 8 pm or so, I saw that it had recovered 605 GB or so and had 4 hours to go. Unfortunately, at 9, I saw the same thing.

This is when you have a serious decision to make, based on the undecidability problem: when an algorithm halts, you know it halts (and has either done what it should or not); but when it’s still running, it may halt in future, or it may not. We were in the second part of undecidability, and it certainly looked like the thing was stuck. So, decision time:

  • cancel and restart, in the hope of a new restore not getting stuck, and getting done by morning, or
  • leave it alone and hope.

I chose door #2.

Good call; it finished around 10 pm, at which point I set about the task of tidying up a variety of little things, including turning off automatic updates in System Preferences and automatic back-ups in Time Machine, as a precaution, so nothing would get clobbered inadvertently before I’d had a chance to confer with the Apple Support advisor.

Apple Support, take three

I dutifully opened the email from the Apple advisor and the first thing I noticed was that although she reiterated that I could just reply to the email, it actually came from noreply@apple.com. This was not encouraging, to say the least, but I sent an update anyway.

Then I clicked the link. I won’t go into the gory details, but over the next day and a half I have experienced

  • a spinning ticker indicating that it’s stuck in la-la land
  • a request to sign in with my Apple ID, following which I get a 403 Forbidden
  • a successful landing at the message page, upon which I enter my updated information, press submit, and am informed that I cannot submit at this time, please try again later.

Repeat ad nauseam; the last is the least frequent occurrence.

Fortunately, she said she’d contact me next time she was in the office. Her office days being listed as Tuesday through Saturday, I expected a call Friday. I didn’t get one. I also didn’t get one today, Saturday (office hours start at 10:00 and it’s now 13:13).

Short version: there is no Apple Support, take three.

On my own, again

This left me wondering what to do next, as I was facing another undecidability problem, the algorithm this time being ‘response from Apple Support’. I decided to instal Big Sur, since going backwards had done no good ….

Step one: perform a back-up

Ordinarily, I take my life in my hands and just do it. But, having run out of ordinary feelings, I decided to do the Right Thing and perform a back-up.

Enter Time Machine, start backup. Back-up disc not found.

Say what? no, not the Hot-knife Boogie. The RAID drive was asleep. I haven’t yet figured out how to wake it up gently, so I did the violent thing and powered it off, then on again. And guess what ….

The external monitor came on.

Now, the external monitor is plugged into the same adapter as the RAID USB cable, so presumably there’s a connection (no pun intended) but I’m not sure what. It could still be some kind of software bug, or it could be the adapter, but that seems less likely under the circumstances.6)I did order a replacement/spare from Amazon yesterday, for two reasons: a) an on-line order from Apple would take 10 days to arrive, b) a trip to the nearest Apple Store would cost me most of a day, c) it would cost me CAD 89.00 plus tax while the third party option was half that and thanks to Amazon Prime was likely to arrive the same weekend. (Aha! Among my considerations were such elements as …. And I’m not expecting the Spanish Inquisition!! Yeah, yeah, I know—nobody expects the Spanish Inquisition-nah! Just shaddapayouface.) In fact, I’ve just now received an email saying it’s being delivered, a whole day early!

Ok, so I do have a backup from yesterday and I’ve done next to nothing since then, so never mind the back-up, let’s go for the gusto and do the installation of Big Sur.

Step two: instal the new macOS

My system informed me the download of the new OS would take two hours. Instead, it took about one.

Installation took a half hour. Then some more time once it rebooted. So in the end, maybe two hours total.

And then nothing happened. It started the reboot, and I ended up with two blanks screens.

Undecidability #3: do I do a reboot with the power button or wait? Well, waiting has worked well so far, so off to lunch and we’ll see when I get back.

Nice lunch: toasted tomato sandwiches using my tasty kalamata olive bread. Yum.

Return, check computer: nope, still two blank screens. <Insert swear words here.>7)I really just mean this for effect because in fact I did no such thing. I think I’m all out of negative emotions, having expended them the last few days already.

Shitsky, as they say in Russia. Ok, guess we’ll have to do the power button thing. Well, I don’t know whether I touched the trackpad, whether on purpose or by accident, or whether grazing the power button had the effect, but in any case, both monitors came up, and I was dazzled by Big Sur. A better name for the theme might have been Big Disappointment, but I’ll let you follow the link if you want to know what I was thinking in detail.

What if I reboot?

So now the big question is: what will happen if I shut down now, and do a reboot from off? The RAID back-up is asleep at the moment, so it will be interesting to see what happens. I’ll be back in a moment to let you know. (Thank God for ‘Save draft’!)

This is what happens

This is totally weird. (Unlike, presumably, everything I’ve said so far.)

When I shut-down, the RAID back-up drive woke up. I’ve noticed this before, but had forgotten. I guess it just makes sure there’s nothing lying around it should attend to before we go down. Well, so much for rebooting with a sleeping RAID back-up; I guess we’ll see what happens in this scenario, and I can always do it again and wait for it to go back to sleep before rebooting.

The monitor on the laptop came on. The external one did not. This is like the recent days when I’ve had trouble getting the external monitor to display; in the past, if memory serves (could be a medium-sized ‘if’), both came on immediately. Bummer. Still have the problem.

Boot up slider bar progresses—seems to take quite some time—then the screen goes blank. What?? Oh, wait—it came back … and the external monitor came on. Okaaayyyy ….

I guess I’ll shut down and wait until the RAID drive goes to sleep, and try again.

This is what happens when I wait

Only the laptop monitor comes on. There’s no flicker and then two screens. End of.

Then I had another idea. I moved the RAID drive to that adapter from the back of an Airport Extreme, whose only function was to provide a port to the RAID back-up, after my interchange with Apple about the dead back-up system. The last person I talked to told me that my set-up wasn’t supported, and the one previous to that had suggested moving it directly to the Mac; so I did that.

It solved the back-up problem … but it could be that it introduced this one. So I decided to try something.

Testing another theory

I shut off the system and made sure the RAID drive was asleep. Then I unplugged the RAID drive from the adapter. Then I rebooted.

Presto! Everything is fine. When the system was running, I plugged the RAID cable back in. RAID came to life.

So this rather suggests that there’s some contention on the port and that maybe I need to put these things on different ports.

Fortunately, the ‘spare’ multi-adapter should be here within a few hours at most, then I can test that theory. Stay tuned!

Adapting to a new adapter

It seemed to me that there could be two potential issues leading to the port problem:

  1. Having the RAID drive and the external monitor on the same port is fundamentally a bad idea, and they should be split up, or
  2. The adapter had somehow become wonky and wasn’t passing through signals properly.

The second theory was the simplest, since it just involved replacing the adapter without moving things around, so I tried that first.

When I shut down, the RAID drive came to life, presumably to do some kind of clean up or other. Well, fine, let me reboot and see what happens. Reboot fine, both monitors came on! Well, may as well get some work done, do a back-up. So I did.

An hour or two later, I shut down again. At same later point I came back, and the RAID drive was still sleeping, so did a reboot. Monitor came on. Ok, looks good.

This morning, same thing. Monitor came on, RAID remained asleep. Now, does that mean that the RAID is now off-line? Easy to test: perform a back-up. Did that; no problem: RAID came to life and the back-up was performed, lickety-split, as nothing much had happened since the night before.

I also noted that my cuneiform .inputplugin, which had become dysfunctional (greyed out) over the course of yesterday’s activities, is now functioning just fine.

As far as I can see, case closed.

Post-script

Nothing is ever closed in the world of computing!

As soon as I actually started to do some work, I had to open MS Word because a student had submitted a .docx file rather than a PDF. Sigh.

It crashed upon load, repeatedly; the message suggested I try to re-instal. So I did. Another 1.2 GB song-and-dance, but it’s working again now.

For now.

Notes

Notes
1 During my last hardware debugging session, I had moved the power cable from a port on the right to a port on the left. But remembering that apparently having it on the left can result in overheating, I moved it back to the other side.
2 One was in my home settings, one was global; unfortunately, even though I’d saved this information, it was lost in the steps which follow.
3 Again, I had the code stored, but lost that ….
4 I will try to post on that shortly if I have the time, then come and back-fill this post with the link.
5 I think. Thanks to everything I’ve done since, and my poor memory, it’s hard to be sure.
6 I did order a replacement/spare from Amazon yesterday, for two reasons: a) an on-line order from Apple would take 10 days to arrive, b) a trip to the nearest Apple Store would cost me most of a day, c) it would cost me CAD 89.00 plus tax while the third party option was half that and thanks to Amazon Prime was likely to arrive the same weekend. (Aha! Among my considerations were such elements as …. And I’m not expecting the Spanish Inquisition!! Yeah, yeah, I know—nobody expects the Spanish Inquisition-nah! Just shaddapayouface.) In fact, I’ve just now received an email saying it’s being delivered, a whole day early!
7 I really just mean this for effect because in fact I did no such thing. I think I’m all out of negative emotions, having expended them the last few days already.

macOS update

This morning I updated macOS to Big Sur. My initial impression is that the default wallpaper would be nice if I were on LSD and/or enjoyed the art of Peter Max, neither of which applies.

I also updated GarageBand (not that I use it, really) and Safari.

Snapshot of current stats

Photograph of the triangle with an arrow pointing north and labels showing which garlic is planted where

Garlic fall 2020 (2)

Yesterday I planted the rest of the garlic I had set originally set aside—I may add to it in a day or two, we’ll see.

This time, I used a portion of the corner of the neighbour’s field kindly on loan to me where I had not previously planted garlic, i.e., the southwestern tip, as follows:

  • column closest to the road
    • 12 cloves of Irkutsk at the north end
    • 14 cloves of Portugal #1 at the south end
  • column one in from that
    • 13 cloves of Portugal #2 at the north end
    • 13 cloves of Metechi1)I’ve never grown this type before; apparently it is similar to Persian Star only larger. Jennie likes Persian Star but the cloves always come out so small that they are far too much work, so I’ve given up on those. at the south end.

Notes

Notes
1 I’ve never grown this type before; apparently it is similar to Persian Star only larger. Jennie likes Persian Star but the cloves always come out so small that they are far too much work, so I’ve given up on those.

Filling in the conduit trench

In order to get hydro to my shed and to protect the ethernet cable, I laid PVC conduit from the north side of the house to the south side of my steel shed for the electrics and past the front of the shed to the antenna tower on the north side of our property for the ethernet cable.

The electrician came last Tuesday and fed the wires through the conduit, so it was now safe for me to fill in the trench. I began doing this yesterday, and completed it today.

I filled the trench part way and then laid yellow CAUTION tape in it, except for the front of the shed, which I had had to fill in since I needed to be able to drive in and out;1)I guess I wasn’t thinking; there is no reason I couldn’t have put yellow tape in there when I did that! but it’s not that big a deal since it’s pretty deep and in any case is in a straight line from where the tape ends to the antenna tower.

Then I took photographs to document the approximate location, as shown below.

Photos from shed (north) to house (south)

Trench with tape facing south 1
Trench with tape facing south 2
Trench with tape facing south 3
Trench with tape facing south 4
Trench with tape facing south 5
Trench with tape facing south 6
Trench with tape facing south 7

Photos from house (south) to shed (north)

Trench with tape facing north 1
Trench with tape facing north 2
Trench with tape facing north 3
Trench with tape facing north 4
Trench with tape facing north 5

Filling in the rest of the trench

After this, I filled in the rest of the trench using the front loader as much as I could, from both sides where this was possible.

I drove around the side of the house and tried to get past the trench as it wound its way through the cedar trees; not impossible but touchy.

Guess what? I didn’t make it. The tractor got stuck in the trench and started to lean very badly to the right. Furthermore, the fuel sloshed over in the tank so that it wouldn’t feed properly and died. Total bummer.

I panicked for a bit, and wondered whether I should call the neighbour (a farmer) to come and help pull me out. But then, I had a (perhaps foolhardy) idea….

Pulling the tractor out of the trench

I got our Subaru Forester, mounted the hitch on it, took the emergency tow from my car, and hooked it up to the tractor. I pulled up up just enough that it was reasonably level, at which point I was able to start it, and drive forwards. Saved!!

After that, I finished filling the trench with the backhoe. It’s more of a nuisance, since it involves anchoring the tractor with loader and struts, moving some dirt, raising struts and loader, moving tractor, …, and repeating every 10 feet or so. But it worked!

Notes

Notes
1 I guess I wasn’t thinking; there is no reason I couldn’t have put yellow tape in there when I did that!
Medium-sized pizza tray with parchment paper on which sit two small loaves of olive bread.

Two attempts at olive bread

I discovered last night that the olives in the refrigerator were developing white mould on the surface of the brine. This was no big surprise, in fact, I’m surprised it didn’t happen sooner, since the refrigerator in question hasn’t worked properly since the beginning of the pandemic shutdowns in March. The replacement hasn’t arrived yet (it’s due on November 19th) and I simply didn’t get around to doing anything with the olives.

Preparing the olives

So, I rinsed them multiple times in the sink and left them to soak overnight and packaged them into freezer bags this morning. I tried a few; they didn’t taste of mould at all, but they also didn’t taste of brine anymore (big surprise!) so I thought I should maybe cook with them.

Olive bread—attempt one

I did a quick internet search for an olive bread recipe, and found this one, suited to the bread machine.

The first time, I forgot to put the chopped olives into the nut and raisin container in the lid and dumped them in with the regular dough ingredients instead. It’s a feature I’ve only used once or twice, and that was long, long ago!

Not surprisingly, the dough was far too wet; I ended up adding one extra cup of flour part way through the cycle. It was still a little wet, but rose nicely. My wife suggested it might not cook entirely on the inside, so I ended up cutting it in half to make two smaller loaves and rising it a little longer in a slightly warmed oven. It seems to have turned out just fine; I gave one each to two of our neighbours.

Olive bread—attempt two

The second time, I was more careful, and put the chopped olives into the lid compartment as suggested. This time, the olives were not mashed up as much; the dough was still too wet, to my mind, but one third of a cup of flour seemed to do the trick.

The loaves didn’t rise quite as well as the first time around, for whatever reason, but the results were ok.

Overall assessment

The recipe I chose works well enough as a starting point—reviews on its page rave about it, in fact—but I think it needs some customization:

  1. Assuming one would like to keep to the specified flour quantity (3 cups),1)This is the maximum recommended for my machine, so I’m going to go with this. the water should definitely be reduced. An equivalent challah loaf nominally calls for 1 cup 1 oz of liquid, including egg (so about the same specified here) but I’ve found that reducing this to 7 7/8 oz is preferable. Add to this the fact that olives contain some moisture, and I’m inclined to try 7 1/2 oz next time around and go from there.
  2. 3/4 cup of olives came out to exactly 100g the first time I measured them out. I found the result a bit sparse in that department, so I think I’ll go for 150g next time.

Notes

Notes
1 This is the maximum recommended for my machine, so I’m going to go with this.

Miscellaneous yard work tasks

Today I did a number of things with a view to beginning to fill in the trench from the house to my steel shed now that the electrician has been and run the wires.1)He will come back once I’ve moved all the things in my shed to the centre to instal the panel, lights, and some receptacles.

The tractor fuel was getting low, so I drove to the Chalmers fuel station nearby and got myself 20 litres of diesel.2)I had already put conditioner into the jerry can some time back in anticipation of this.

Then I had to set up the tractor for the job. This involved

  • dropping the rear-mount tiller in the back of our yard near the tree line3)There is no need for it to live in the shed, where it would just take up a lot of space.
  • removing the three point hitch
  • mounting the backhoe,4)This was quite painless for a change. I keep it on a dolly I made for the purpose, and was able to wheel it into place, use the struts to raise it just a fraction, slide it in, line up the pin holes, and mount the pins. It took maybe 20 minutes, possibly less. and
  • removing the mower deck.5)I ought to have done this before removing the backhoe to mount the tiller in the first place, but forgot!

Then I started filling the trench. It sounds easy enough, but the reach with the front-end loader is limited, and the dirt pile from the trench was on the far side in most cases.6)Going to the other side of the trench was mostly awkward because of various obstacles on that side. I didn’t want the front wheels of the tractor to get too near the trench lest there be a cave-in and I end up stuck. I could have turned about and used the backhoe, but that involves a lot of mounting a dismounting every few minutes to move the tractor to the next segment of the trench.

I used a shovel to even it out a little, and got probably 75% of it done before I felt that I should likely give it a rest and continue another day. No point in getting hurt.

Notes

Notes
1 He will come back once I’ve moved all the things in my shed to the centre to instal the panel, lights, and some receptacles.
2 I had already put conditioner into the jerry can some time back in anticipation of this.
3 There is no need for it to live in the shed, where it would just take up a lot of space.
4 This was quite painless for a change. I keep it on a dolly I made for the purpose, and was able to wheel it into place, use the struts to raise it just a fraction, slide it in, line up the pin holes, and mount the pins. It took maybe 20 minutes, possibly less.
5 I ought to have done this before removing the backhoe to mount the tiller in the first place, but forgot!
6 Going to the other side of the trench was mostly awkward because of various obstacles on that side.

Page 4 of 8

Powered by WordPress & Theme by Anders Norén