Snowblower hoses attach to tractor from back to front as follows:
- White
- Blue
- Red
- Yellow

Snowblower hoses attach to tractor from back to front as follows:
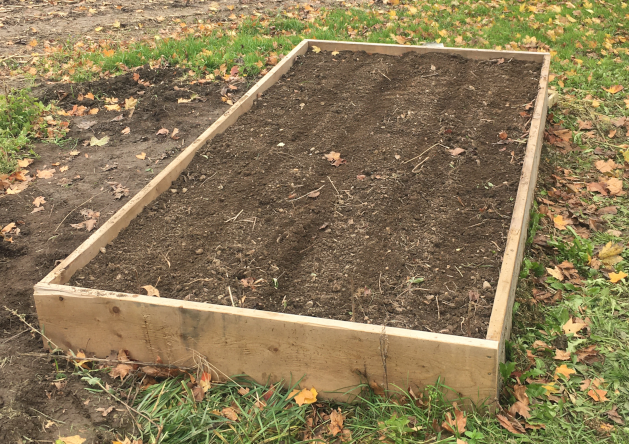
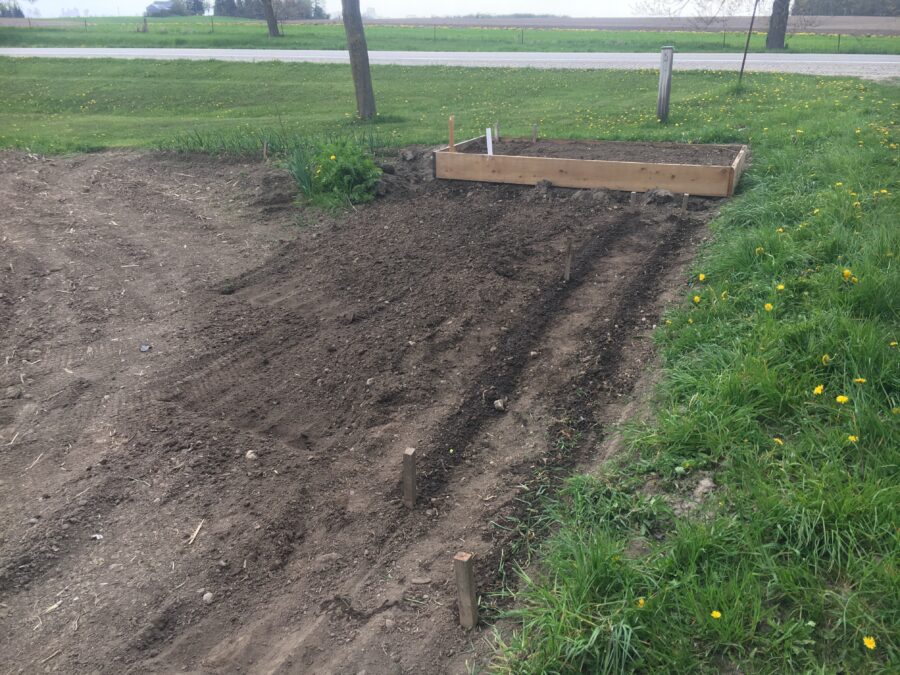
A few weeks ago, I moved the raised bed in the corner of the farmer’s field further to the west so as to waste less of the space available to me. I intend to add more raised beds in the remaining space in the spring.
The field slopes quite a bit more at that point, so the soil in the box needed topping up, which I did yesterday afternoon with the tractor.
Today, I planted the garlic in four north/south columns, beginning from the west side and leaving a 2″ margin before the first column. Cloves are spaced 5″ apart within a column with a 2.5″ margin at the top and bottom.
This allows for 24 rows, which I planted as follows, beginning at the south end and working my way towards the driveway:
The types are interspersed so that in the event of a problem in one part of the bed, the entire harvest for that type is less likely to fail.

The Subaru dealership told me a while back that I should replace the pads in all four breaks. When I had it in to a local garage for some muffler work I couldn’t do myself, they told me to replace the rear pads.
So I did. I used Brembo P78014N (113-2600-2) following the prescribed procedure.
Statistics and details:
It doesn’t seem to have been as urgent as all that; and if I did the measurements correctly, the left pads seem to wear more quickly. I should keep an eye on this in case it indicates a caliper problem.
Having finally repaired the stratocaster input jack, I decided to take it for a test drive as my first venture into Rocksmith on the Dell PC.
Guess what? Rocksmith told me the cable wasn’t connected. Aw, man!!
I spent most of the afternoon debugging this. I updated all kinds of drivers and GEForce Experience, tried to update Direct X run time module(s),1)Apparently I had the latest version already. updated the BIOS with a flash, 2)All the while holding my breath!, tried all four USB 2.0 ports, for good measure tried USB 3.0 too,3)Apparently the cable isn’t compatible with those, which may be dubious information, but as it wasn’t working anyway …. and finally tried a powered USB hub. Nothing doing.
So then I installed the Discord app and posted a query on the CustomsForge channel. Apparently power issues are the most common cause of the so-called Code 10 error I was getting4)This is visible from the Device Manager, by the way. but I’d already tried that.
While I awaited a reply, in total despair I tried the other ports on the powered USB hub. It turns out that the one nearest the power supply input worked!!
This sounds like a potentially unstable solution, so I’ll likely obtain another powered USB hub if someone gets back to me regarding that.
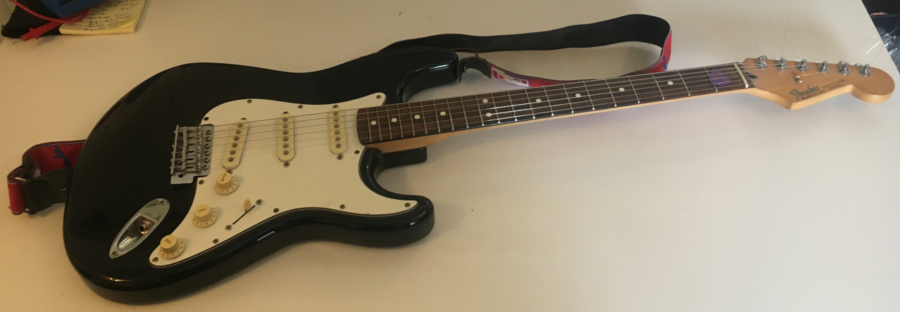
Somehow, the little hex nut which holds the input jack on my Mexican Stratocaster had got loose and fallen off somewhere in the basement. I may find it someday, but there’s a lot of stuff I’d have to move to do that as I have no idea in which area it fell. Ok, well, it was probably due for a replacement anyway, as it buzzed about as though there was some issue with grounding.
I spent a day first looking for replacement hex nuts1)It took me a while to find the likely specs of the nut in question! but as I was concerned about getting it right, and given the cost and inconvenience in the COVID world, I decided to just replace the whole jack. The guitar, a gift from my brother many, many years ago, probably could do with a new jack; it didn’t seem to be grounding properly, at least, that’s what I assume from the buzzing sound I got when I wasn’t touching the strings.
It took a while, but I eventually discovered that I could get 10 replacements for the same price as a single one through Amazon; eventually, I settled on these, at CAD 9.99. The order was placed on 13 March 2021 and they arrived on 22 March. Not bad at all!!
I should have paid more attention, I suppose, because it turns out that these were not identical to the one being replaced, as I’ll explain shortly. But this was the most cost-effective option, and all was well in the end.
Life being what it is, I didn’t get around to the actual repair until today, 23 May, so two months later! Never mind ….
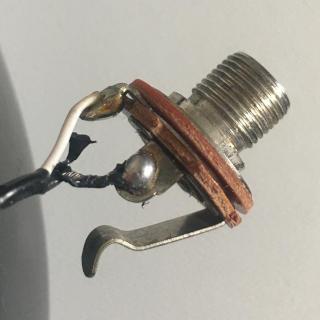
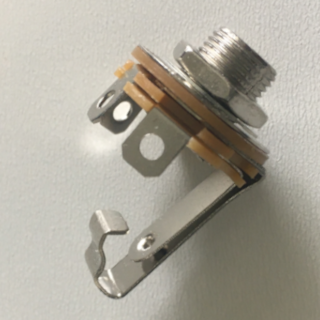
Here are images of the old jack and the new replacement. As you can see, the old jack, being a standard mono jack, had only two connections, while the ones I bought, being TS jacks,2)I did try to find information on the intended purposes, but though there is a lot about TS and TRS cables, no one really seems to discuss the jacks. had three.
Rather than rely on outside sources in this situation, I decided to conduct my own diagnosis in order to come up with a solution. To this end, I got out my handy multimetre, shown below.
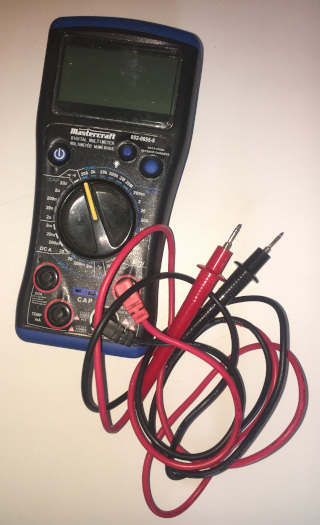
I set it measure ohms (i.e., resistance) and checked for connectivity between the lugs and the shaft and flanges,3)Sure, I could have eyeballed it, but my eyesight isn’t that great with the tethered floater in my right eye, and may as well have some fun being scientific. starting with the original—before removing it! And since the two flanges were in contact in the TS jack, I inserted a piece of paper between them so that I’d be able to test the lugs without dealing with short circuits.
I determined the following:
So it became clear that the black wire was to be soldered to longest lug while the white was to be soldered to the middle lug. The third lug was immaterial for my purpose.
Repair was straightforward:
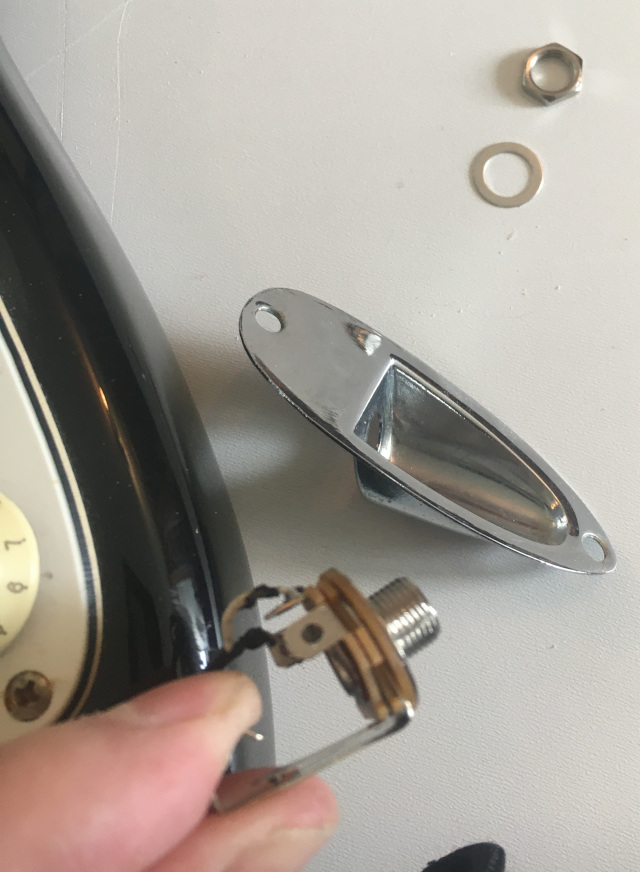
The parts involved in the the reattachment are shown in the next image, which highlights the order of assembly, most importantly that the washer is placed between the ferrule and the hex nut.
And that was it! Like new!
Notes
| ↑1 | It took me a while to find the likely specs of the nut in question! |
|---|---|
| ↑2 | I did try to find information on the intended purposes, but though there is a lot about TS and TRS cables, no one really seems to discuss the jacks. |
| ↑3 | Sure, I could have eyeballed it, but my eyesight isn’t that great with the tethered floater in my right eye, and may as well have some fun being scientific. |
| ↑4 | This being the housing from which it protrudes. |

I found a bag of peas in my travels around our property recently, so decided I’d try to plant some.
They’re a few years old, at least, so they may not come up; but, as they’re already here, it costs me nothing, and I was able to put them just west of the raised bed box where I couldn’t put anything else anyway.
We shall see!
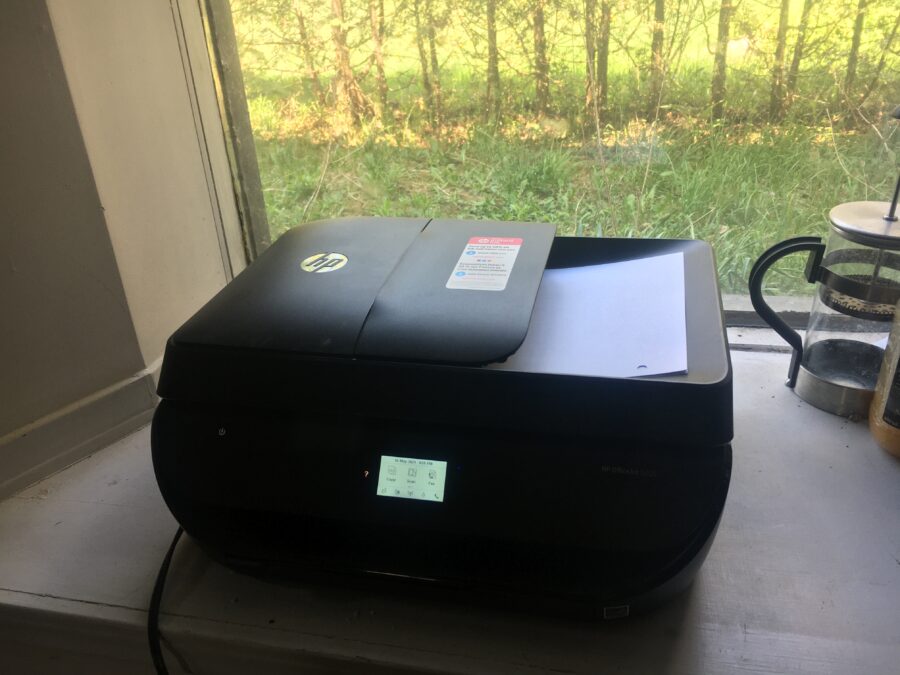
I had planned to use the new Epson scanner to scan my Arabic homework, but then realized that there was no sheet feeder, so opted for using the HP Officejet instead.
So I installed the software for that onto the Dell PC.
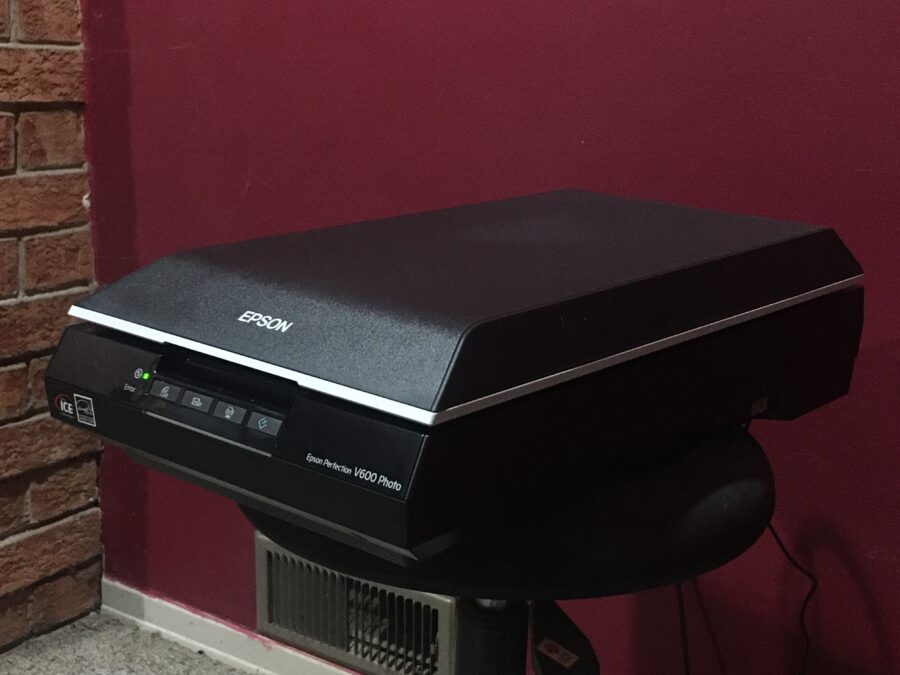
Today, as my left calf was giving me considerable grief following yesterday’s rope skipping incident, I decided to do ‘relaxing’ things. Setting up the slide scanner which arrived a few weeks ago seemed a good idea.
It’s pretty clear that the instructions were written in the dark ages and never updated; they referred to Windows 7 and Windows 8; problem resolution suggested verifying that the computer was USB-compatible (after suggesting one make sure the thing was in fact plugged into a USB port!), etc. I can only assume that they are in competition with HP for the Tech Darwin Award of the Century.
Minimal instructions on set-up and a CD-ROM. Going to the Epson on-line site did provide a download option, so did that.
Then spent a frustrating half hour trying to get the thing to even come on. Got the voltage tester out to make sure there was in fact juice coming out of the adapter, and yes indeed, there was. That’s when I discovered the ‘On’ switch cleverly hidden on the right side of the unit, near the back, in a recessed cavity. That would explain why there was nothing obvious on the front, and I had to revise my initial assumption that the thing must just always be on.
It took me another hour to figure out how to scan slides. Pushing the buttons on the front of the unit as suggested in the instructions did nothing whatsoever. I thought that this being Hell—pardon me, Windows—maybe I had to reboot to activate the driver. Uh, no. Ok, let’s do it the other way and run the software from the computer end.
I kept being told that no document was found. I assumed that the fault lay in my scanner setting choices, none of which was ‘slide’, ‘diapositive’, or the like. It turns out that I’d placed the slide holder the wrong way around onto the scanner bed. I must take the blame for not having used a microscope to check the details in the image in the instructions; mea maxima culpa!
Finally got that sorted out, and found that the ‘scan’ option was greyed out until I’d done ‘preview’ first. My apologies; I haven’t visited the 50s in some time. I then discovered that *after* the preview the button on the front of the scanner worked. Um, ok, but if they force me to start at the computer end, what’s the point? I assume that there’s something I’m missing somewhere. Time to submit a ticket to the support animals … again ….
I pulled four slides from an arbitrary Paximat1)A projector which I inherited; the slides are placed into long plastic container which are then placed into the projector. box; I noticed that that particular part of the box was labelled ‘Wittelbach’ and that the slides themselves were dated to various days in September 1995.2)By the way, I adopted a convention for labelling the slides according to where I get them from; in this case PM-01-YYMMDD, where ‘PM-01’ refers to ‘Paximat Magazin 01’ and ‘YYMMDD’ refers to the date on the slide. If slides are undated I’ll come up with something else (like the slot number) and where there are multiple slides for a given day I’ll just add a numeric suffix.
This process (even at 300 DPI) is low as molasses in January in the Antarctic. Anyway, here are the results of the first attempt.


Notes
| ↑1 | A projector which I inherited; the slides are placed into long plastic container which are then placed into the projector. |
|---|---|
| ↑2 | By the way, I adopted a convention for labelling the slides according to where I get them from; in this case PM-01-YYMMDD, where ‘PM-01’ refers to ‘Paximat Magazin 01’ and ‘YYMMDD’ refers to the date on the slide. If slides are undated I’ll come up with something else (like the slot number) and where there are multiple slides for a given day I’ll just add a numeric suffix. |
Today was nice weather, so I had little excuse for putting off the various outdoorsy things I had to do, so I made a start on them. I usually end up doing more than I’d planned once I get going, which is good!
My first task was to start with the planting of seedlings. I read the instructions, which suggested I till the soil to keep weed competition down, so I went into the shed and got out the mini tiller. I was gratified to find that it started right up! I’m getting better at this overwintering business 😀
Then I got out one bundle of cedars, which is a ten count, dug holes with the spade, and placed them into the first two gaps in the cedar row where they had died out. Then added some water to start them off. 6L deep watering once a week, they said. But I have to do this by hand for now,1)Meaning using a watering can rather than a hose. so I’ll have to adapt.
While I had the mini tiller out, I ran it up and down the garlic rows and so on to get rid of weeds.
The other day, the farmer’s wife told me he was planning to come and fill the raised bed box he’d given me, so I hurried over to the menure pile he’d put for me behind our property while I still could (once he’s planted, it’s much harder), and put some in the bottom. That night, he came with his tractor and put a bucket load of topsoil into it.
Today I decided to try to level it. Sure enough, it was several inches down over 10 feet, and I imagine it works best in terms of rainfall when it’s level, so I got my little tractor and used the bucket to raise the two low corners, backfilling the run-off with the spade.
Then it was no longer all that full, so I took two bucket loads (my buckets being of course much smaller) of topsoil from a pile I had left over from putting in a second driveway in front of my shed, and levelled it off.
When I’d done that, I ran the tractor tiller a last time over the area the farmer had had his tractor over, then went to the back of the yard and took it off.
I took a look at the seeds I’d bought the other day, and decided on parsnips, celeriac, and lettuce, which I planted as follows:
And in-between all this, I think three times in all, I practiced the Leicestershire bagpipe for the second time this year!
I’d have done it sooner, but the weather wasn’t cooperating, and once it did, I had my left index finger bandaged due to the silly mitre saw wound.
The tune was Dorset Four Hand Reel, by the way. I almost know it now!


Although Python can be coded directly in Blender, the editor is rudimentary. In the past, I’ve enjoyed using Visual Studio Code on the MacBook, so I decided to instal it on the Dell PC as well (version 1.56.1).
Then I installed the Python extension, which helps with syntax colouring and so on. I imported the code I was working on to build a deck model, and was told to instal Python itself. Ok, so I did that too (version 3.9.5).
Powered by WordPress & Theme by Anders Norén